
I used to think pho was one of those dishes you just had to go out for.
Then I made a real, from-scratch broth at home, and finally understood why people talk about this soup the way they do.
It takes time, mostly hands-off, but the payoff is a broth so rich and fragrant it’s worth every minute of simmering.
Why This Recipe Works
Charring the onion and ginger before adding them to the broth is a small step that makes a massive difference. It deepens the flavor and adds a subtle smokiness you just can’t get by adding them raw.
Simmering the bones low and slow, skimming as you go, is what gives you that clear, rich broth instead of something cloudy and flat. 🍜
Toasting the whole spices before they hit the pot wakes up their oils and fragrance, which is exactly what gives pho broth its signature aroma.
What You’ll Need
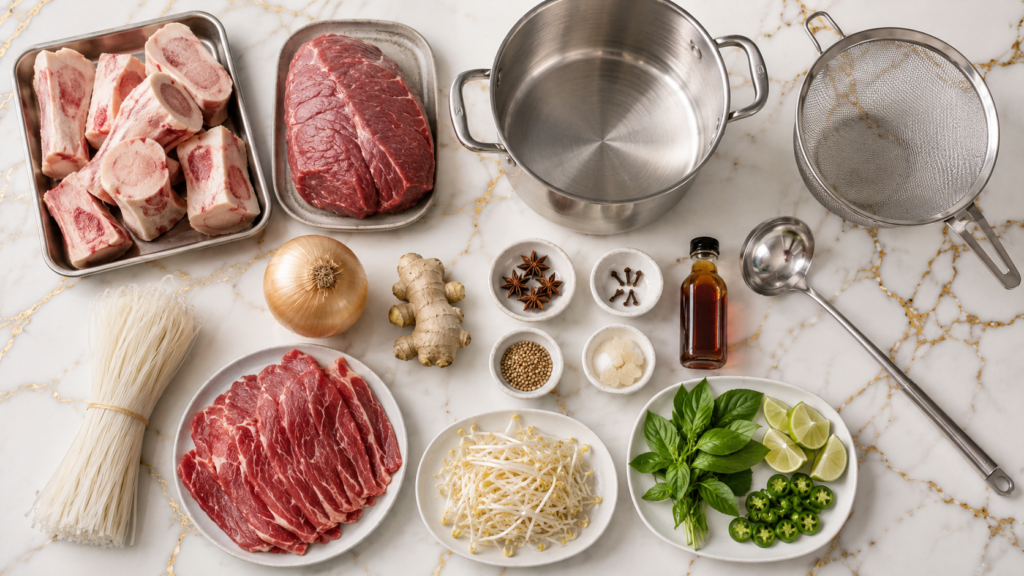
| Ingredient | Amount |
|---|---|
| Beef bones (marrow or knuckle bones) | 3 lbs |
| Beef chuck or brisket | 1 lb |
| Yellow onion | 1 large |
| Fresh ginger | 3-inch piece |
| Star anise | 4 pods |
| Whole cloves | 4 |
| Cinnamon stick | 1 |
| Coriander seeds | 1 tsp |
| Fish sauce | 1/4 cup |
| Rock sugar or brown sugar | 2 tbsp |
| Salt | 1 tsp, plus more to taste |
| Water | 12 cups |
| Rice noodles (banh pho) | 1 lb |
| Beef sirloin, thinly sliced | 1/2 lb |
| Bean sprouts, fresh basil, lime wedges, sliced jalapeño | for serving |
Rock sugar gives a subtle, less overtly sweet flavor than regular sugar, but brown sugar works well as an easy substitute.
Tools You’ll Need
- Large stockpot
- Fine mesh strainer
- Small dry skillet, for toasting spices
- Ladle
- Sharp knife
Pro Tips
1. Blanch the bones first before making the broth. A quick boil and rinse removes impurities that would otherwise cloud your finished broth.
2. Char the onion and ginger under a broiler or over an open flame. This step takes just a few minutes but adds real depth to the final flavor.
3. Skim the broth regularly during the first hour. This is what keeps it clear instead of murky, especially early on when the most impurities rise to the top.
4. Slice the raw beef sirloin paper thin. It cooks instantly once the hot broth is ladled over it, so thin slices are essential for the classic pho experience.
5. Toast your whole spices before adding them to the pot. A couple of minutes in a dry skillet brings out fragrance that raw spices just can’t match.
Substitutions and Variations
- Quicker version: Use a good quality store-bought beef broth as a base, simmered briefly with the charred aromatics and spices for a faster approximation.
- Different protein: Add cooked meatballs or brisket slices in place of or alongside the raw sirloin.
- Vegetarian version: Use a mushroom and vegetable broth base with the same aromatics and spices for a plant-based take.
- Spicier version: Add extra sliced jalapeño or a spoonful of chili oil to your individual bowl.
- Instant Pot version: Pressure cook the bones and aromatics for about 90 minutes to significantly cut down the total time.
- Extra herby: Add fresh cilantro or Thai basil alongside the standard herb plate for more variety.
Make Ahead Tips
The broth is genuinely better the next day, once the flavors have had more time to settle and deepen.
Make it up to 3 days ahead, store it covered in the fridge, and reheat gently before assembling bowls. It also freezes well for up to 3 months.
How to Make It
- Blanch the beef bones in boiling water for 5 minutes. Drain and rinse well under cold water.
- Char the onion and ginger under a broiler or over an open flame until blackened in spots, about 5 to 8 minutes.
- Toast the star anise, cloves, cinnamon stick, and coriander seeds in a dry skillet for 1 to 2 minutes, until fragrant.
- Add the blanched bones, chuck or brisket, charred onion and ginger, and toasted spices to a large stockpot with the water.
- Bring to a boil, then reduce to a low simmer. Skim off any foam or impurities regularly during the first hour.
- Simmer uncovered for 3 to 4 hours, adding fish sauce, sugar, and salt during the last 30 minutes.
- Remove the cooked chuck or brisket, let it cool slightly, then slice thin.
- Strain the broth through a fine mesh strainer, discarding the solids.
- Cook the rice noodles according to package instructions, then divide them among bowls.
- Top with sliced sirloin, the cooked chuck or brisket, and ladle hot broth over the top. Serve with bean sprouts, fresh basil, lime wedges, and jalapeño on the side.
Nutrition and Diet Notes
Here’s roughly what you’re working with per serving (recipe serves 6):
- Calories: about 420
- Protein: about 28g
- Sodium: about 850mg
For a lower sodium version, reduce the fish sauce slightly and add extra salt only to taste at the end.
What to Serve It With
- Fresh herb and bean sprout plate on the side for topping
- Hoisin sauce and sriracha for individual customization
- A simple side of Vietnamese iced coffee if you want the full experience
Leftovers and Storage
Store the broth separately from the noodles in an airtight container in the fridge for up to 4 days.
Reheat the broth on the stovetop over low heat, and cook fresh noodles each time you serve a portion for the best texture.
The broth freezes exceptionally well. Store in a freezer-safe container for up to 3 months, and thaw overnight in the fridge before reheating.
FAQ
Why is my broth cloudy instead of clear?
This usually means the bones weren’t blanched first, or the broth boiled too vigorously instead of maintaining a gentle simmer.
Can I make this in a slow cooker or Instant Pot?
Yes, a pressure cooker significantly cuts down the cooking time, typically to around 90 minutes for the broth, while still developing good flavor.
Do I have to slice the raw beef paper thin?
Yes, this is important. Thin slices cook through instantly when hot broth is ladled over them, which is part of the classic pho experience.
Can I use a store-bought broth as a shortcut?
Yes, simmering a good quality beef broth with the charred aromatics and toasted spices for about 30 minutes gives you a reasonable approximation with much less time invested.
How long does this broth take from start to finish?
Plan for at least 4 to 5 hours total, though most of that time is hands-off simmering rather than active cooking.
Wrapping Up
This bowl taught me that some dishes really are worth the wait, and making it at home only made me appreciate it more.
It takes patience, but the process itself is mostly hands-off, leaving you with a broth that tastes like it came from somewhere much fancier than your own kitchen.
If you make this, come back and tell me how your broth turned out, or what toppings you went with. 🍜
I’d love to hear how yours turned out.